Monday, July 9, 2012

Back yard landscape update

Been spending a lot of time this week in backyard again!

Just as a reminder, these were THE BEFORES of the backyard landscaping weedy nightmare


These are after hours and hours of cutting trees myself, having a few professionally removed, after pulling weeds, removing all the ivy from the privet heads on the property line in the back, digging my own beds, and mulching myself!!!! And I'm not even halfway there!
The 100$ worth of seeds I planted, seem to only be sprouting like six plants. 
Makes me so mad.  I need to remember to call and complain to wherever I bought those online.....
Half of them were moldy.  I gave them a shot and now I'll never plant a seed/bulb garden again.  Pointless.  Sigh.....

Just this week, I put in a new butterfly bush and a new hydrangea. 
This gardening is hard hard work, but I do love it. 
Once plants start coming in or when I plant some more things, the painstaking hours and hours will have been worth it.  I think.   For the beauty of it..... I can envision it.  Will be awhile.

Working on estimates for a small bit of fence in backyard.  Between neighbors house and ours. 
Hopefully will have 25 foot of fence by end of August.  And a patio.  A patio with an awning.  Dreaming big. 

Anyway, just a quick peek into my ongoing project.  There was SO much ivy.    


Stair Newels and Rails Complete


It all started with a vision.  A vision of a grand staircase upon entrance to our house.
It's probably what the house looked like when it was first built. 
(You could actually see where the original curved stair was and where it attached to wall when we started digging!)

To get to our end result, it required removing walls and closets, turning stairs and making new and ...recreating similar newel posts and rails to match the original ones which were exposed upon removal of closets and walls.  
It required the whole stair set to be removed and reinstalled because when we removed the carpet on the stairs, the bottom set was coming away from the wall! Scary and unsafe.

So now is the big reveal.  Many iterations occurred to get us to our now oak newel posts. 
And I think it looks fabulous. 

                                                                   THE BEFORE


THE AFTER


                                                                      THE BEFORE
                                                                     THE AFTER


                                                                   THE AFTERS


How about those before and after shots?
Huge transformation!
Now it's open, more grand, but more welcoming with all the stained oak....

Now if I can only convince Jon that my new antique ice cream parlor stool with plant needs to stay on the landing of the stairs as to balance out that window that is not centered.  That may be my biggest feat yet.  I say it stays.  He says it goes.  I say stay.

Tuesday, June 19, 2012

Living Room And Dining Room Floors, Sanded and Stained

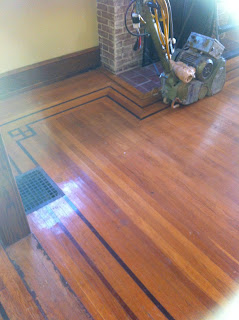
June 2012 - After almost one year in this house, we finally decided it was time to call in a professional to re-do (sand and stain) the oak and walnut hard wood floors! ...and the treads and risers on the stairs.

BEFORE PICs - Had some old vents better placed in room.  Old vent holes will be fixed of course as will the dark walnut inlay, that was destroyed when they initially cut for those strangely positioned vents. 


 This was the floor after the closets were removed!  All that mess sanded out perfectly after!

 With all the light streaming through, it is hard to see the picture frame of old stain on floor. 
Seems someone had stained only the area of floor to be seen outside of large rug.


DURING PICS -


Sanding begins

Stain Options
  Sanded down to wood, removed all previous stain and urethane


 ALMOST AFTER pics -


Had to custom make and replace all the cracked boards around fireplace tile. 


After pics to come of stairs and rails all put back together with stained newels.....when that project is done!!!! Should be another week or so.  And when they tell me a week, it means a month.  :)

Been dusting for days.  So much woodwork around windows and doors.
 
The stained floors make a HUGE HUGE difference. 
Finally feels like the rooms are almost "finished" and ready to decorate.
But who has money to decorate now!? :)

In just that livingroom alone, let's think back.... We removed wooden paneling.  We cut a doorway into wall from livingroom into diningroom. We ripped off wallpaper and re-did walls and painted.  We ripped out a closet.  We removed a door and added a window.  We turned the stairs and remade some new ones.  Made new matching newel posts.  Took out lighting fixtures.  Added new light fixtures.  We removed the paint from fireplace and tile.  Not in that order, but nonetheless
 .....And now the floors.  Phew.  That was in just one room! It's amazing. 

Wednesday, May 2, 2012

DIY basement window screens

Sometimes I impress even myself with the use of tools that I've never been taught to use and my ingenuity!!!! :)  
I ripped off the basement wooden screened window frames and I scraped and sanded them, then repainted them and then ripped, tore, removed with all my might these old and torn but very connected screens that they had in them.

I went to the store purchased some new screen and after fixing up the wooden frames, stapled the new screens on.  They look better indeed.  Just a temporary solution for now using the old wood.   We may need to remove these completely and/or build new ones.

BEFORE and BLUE with old screen


AFTER green and with new screen


Blue Vinyl Siding Under Windows got Painted DIY

I got ants in my pants to paint. 
I want to finally be rid of the blue. 
Painted most of the under window blue all around house on each floor.
Moving the heavy ladder gave me bruises all over and I kind of made a mess in some places on the white siding with the dark green paint.  Need to find a solution to fix.  One that doesn't melt plastic vinyl.  Yikes.

BEFORE

 DURING
 AFTER

Hard to tell in pictures especially, but the blue was faded and old.  The dark green looks much better.

Thursday, April 19, 2012

Front Professional Landscaping

We went from BLAH to BAM!  :)
We had professional landscapers do major transformations to the house, along with digging and installing and burying drainage systems on each side of the house.
Boxwoods now line the front sidewalk. 
And Boxwoods and perennials dress the front beds.
American Holly tree on side of house - cleaned up pebble zone mess and created more of a mulch bed there.  Will soon plant ground coverings there.

BEFORES


DURING


There is green everywhere and green is my favorite color.

AFTERS to come .....